Saturday, March 2, 2013

Growing Seeds on a Shelf in the Garage!

I love plants- flowers, trees, shrubs, bushes, herbs, you name it!  They are so darn expensive though.  Seeds, on the other hand?  Not no much...  Granted, you run into a likely higher mortality rate, but the odds overall are with you.  When your seed packet comes with anywhere from 15-hundreds of the little guys, you can afford to have some that never sprout, some that dye off somewhere between sprouting and planting, and you don't even feel quite as bad maybe if they don't make it once you've transplanted them (hopefully many of them DO make it, of course!).

So, in my own spontaneity, I pulled out Country Living Magazine's article on growing seeds, and started ordering!  My plan was to order 2 seed trays (50 cells each), the water trays to go underneath them and keep the whole thing nice and dry (while keeping the seeds moist), some type of planting medium, seeds, a light, light bulbs, and set it all up in a mostly unused bookshelf in our bedroom... then I received the lights in the mail.  Yikes, should have looked at the dimensions and measured the shelf, duh! :)  So that wouldn't work.  Trial and error, I suppose.  Fortunately, we had some hardware store buy shelves set up in the garage that were much wider, with shelves that should be large enough to allow enough room for a couple months growth.

Here is what I used:

Seed trays-  For <$2.00/ tray, I got my seed trays from this site (both the trays to put the seeds in and the flat ones without any holes in it for underneath (you could also use a large pan or something for this purpose.

Planting medium- for $4.95/ block, this coir was a nice, cheap, eco-friendly option.  The bricks are always a little bit messy, as you have to mix them with water and "watch them grow," but it worked out nicely.  I found that for 2 trays, it took about 1 1/3 bricks to fill the seed trays.

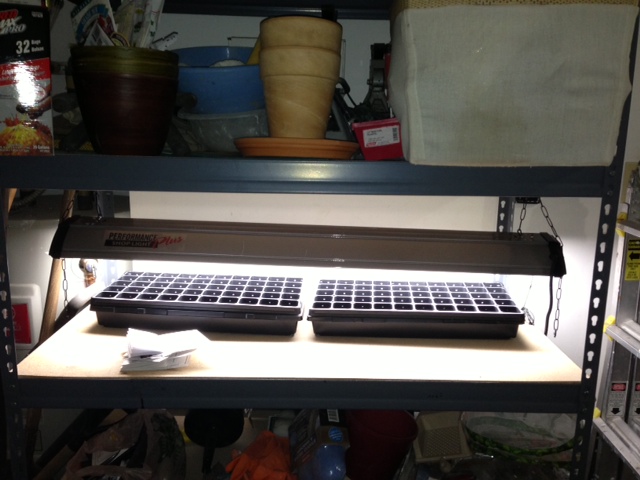
Shop Light- At $32, this was one of the pricier items.  Honestly, it's a regular old shop light, with an adjustable chain for hanging (it is important that it is adjustable, so that you can start with it close to your seeds, and then raise it up as your seeds grow).

Light Bulbs- For $3.49/ each (much cheaper than "grow bulbs!"), these were the recommended bulbs.  You need 2 of them for the light fixture.

A couple hooks into the upper shelf later, and I was in business!

Amazingly, after only 2-3 days, I was already starting to notice some of the seeds sprouting!  Some will take much longer to germinate, and my plan for today is to pick up a heat mat from the store to help out some of the seeds that don't enjoy the cold of the garage so much (I've heard ideally, you should keep it in the 70's for them).


I'm pretty pleased with this for now though, and may come up with something more permanent in the future! :)

Happy growing!!

Update, after just a few days:


Saturday, February 9, 2013

Rustic Whitewashed Wood Paneled Bathroom

As one of our final (indoor) projects (for NOW! :), we gutted and remodeled the guest 1/2 bath.

Most anything was an improvement over the 80's style old bathroom:


Lovely yellowed linoleum, round-bulb lighting, striped wallpaper, pre-fab chunk of mirror, cheapo vanity.  We actually replaced the old toilet pretty immediately, so the old off-white leaky one has already been traded out here.

We traded out the linoleum for an inexpensive porcelain tile from Lowe's:


We used Rialto white (be careful to watch the numbers on the package as the different lots can have very different colors and sizes!)

Next, we installed the wall panels... this part was a little bit intense, but not as bad as we thought it might be!  With these Evertrue pine planks from Lowes (we cut them to fit the wall horizontally, and then they fit together with the v-groove on the sides):


We used a Rustoleum white-wash stain to give it that lovely sunbleached driftwood look:


The mirror came from T.J. Maxx Home Goods, which always has a varied selection.

The sink was another Lowe's purchase:


The lighting was an online purchase, looking for a "farm pendant" style light:

Some accents from Target (shelving and box under sink), and... The final product (for now)!


Saturday, November 10, 2012

Fall Bouquets, Bringing the outdoors in :)

I love to pull things from the yard and use them in a bouquet.  This one has some mums, fern fronds, berries from a tree, flowers from the garden, lavender and rosemary, in different sized and color vases, arranged on a silver platter I inherited.  Voila fall coastal chic! :)


I also recently received this bouquet with some wetland and upland foliage.


Monday, November 5, 2012

Message in a Bottle Guest Book :)

One of my favorite decor items is our "Message in a Bottle," which we used as a Guest Book at our wedding.  While it was perfect for our sailboat wedding, what beach house doesn't need a lovely guest book?

This was so much fun, as it includes little bottles for individual messages and a large bottle for multiple messages.

Choose a ribbon to match your decor, set up a pad of notepaper next to the bottle, with a pen, and you're all set!

Best of all, the final product adds to your beachy decor :)

Make your own, or I bought mine here:  http://www.etsy.com/listing/22868217/message-in-a-bottle-station-guest-book

Sunday, October 28, 2012

Wood tiles? OK! (UPDATE!)

UPDATE:

We finished up the tile!  A little further behind schedule than planned, but c'est la vie :)  We love the final product, but these were a pain!  Bc each piece naturally has some "warp" to it, with their length, they can be difficult to get leveled out, so that you don't have toe stubbers, and of course, the narrower the grout line (which makes it look more "wood authentic"), the trickier it is.

Here's an in-progress:


Tile is done!  Time to put things back, and put up new trim:


(older post)
So, my husband and I could not seem to reach a consensus on what type of flooring to put in the kitchen.  He wanted tile, "because of all the moisture," and I wanted wood, because it looks nice, is softer underfoot and you don't have to worry about cleaning out grout lines.  We went shopping at Lowes, and what did we find?.... Wood tiles!  Well, they are porcelain really, but they use an inkjet printer to make them look like wood, and they actually look pretty good, and at $2.99/ sq ft, they price is right.  Here is a shot of them


Each plank is 6" x 24", so you can lay them in the same floor designs that you would actual wood planks.  Right now, we are trying to decide between herring bone,


or just plain horizontal or straight.

Anyway, I cannot wait to get the tile in there instead of the nasty linoleum!

Here is how it looks at the moment- ripped up 80's linoleum:


Monday, October 8, 2012

Making an Indoor Flower Box


We have an awkward opening in the wall from the third floor master bedroom, into the main (2nd) floor open living/ dining area.  It has shutters that open and close, but has always seemed a little silly, aside from its ability to let in a little more light from the skylights in the 2nd floor's cathedral ceiling.


I had the idea to find a way to hang some plants there, so that when they grew out, it would become kind of a "tropical waterfall" of plants falling down the wall, into the living room... right...


(In this picture, they are just placed on the windowsill, so that we cannot close the "shutters" into the bedroom.)


After searching and hunting for something to hang there, that would be sturdy enough to hang plants from, and also large enough for the window opening, I was coming up dry.  Wooden flower boxes cost hundreds of dollars, which seemed pretty ridiculous, and I would either have to settle for 2 smaller boxes, or have one custom made.

I decided I'd go ahead and give making one a shot, and... it was pretty simple, and I am thrilled with the result.


Here are some of the tools I used:

-mitre saw (although there are no "mitre cuts," so any saw is alright to use)

- (drill;  I LOVE cordless drills, but once again, any drill will do :)

 Wood glue and wood screws

 5 boards (try to buy the "least knotty" and the straightest boards you can find)  Do NOT get pressure-treated either, if it is going indoors, as these have chemicals on them that you don't want to be breathing in daily!


Before you pick out your boards, you need to decide what size box you will need.  For my box, the window sill is just under 8'.  My plan was to screw the side boards into the sides of the bottom board, so the boards would need to be wider than whatever I wanted by at least the width of the bottom plank. My two end pieces would also be screwed into the end of the bottom board, and the edges of my "long side boards," so the long pieces would be the full length of the sill, minus the thickness of the two end pieces, if that all makes sense.  Depth and width-wise for the actual interior of the box will depend on the size of plant containers that you would like to place inside.  Mine were only a 4" diameter, and 4" deep, so I used 1x6x8 boards for the sides and bottom, and a 1x6x4 to cut the end pieces from.

You can certainly do fancier cuts (mitred angles) or other things with this, but I was looking for something basic.  

Once I measured out the lengths that I wanted (be careful- measure twice, cut once!), I took my remaining pieces and laid them out how I wanted them to fit (I kept the "ugly" sides toward the back or inside).  

Once I had my setup, I took wood glue and began gluing them in place.  After I glued each one, I immediately took the drill and drilled the ends together (a screw every 3" or so).  This is a close-up of one of the ends, prior to filling, sanding or painting.


Once I had all the pieces assembled, I went back over the whole thing and filled in all the screw holes and any knots or other blemishes that would be visible with wood putty.  I let that all dry and then sanded it all down with some medium and then fine sandpaper.

Once it was nice and smooth, I gave it a nice coating of Kilz primer to prep the box for painting.


Once it dried, I painted it with a high gloss interior white paint.  You can use whatever color you like, or I've seen really neat ones where you can take paint stirrers or flat wood stakes or wedges and paint them different colors and glue or nail them onto the sides.

I had my husband help me hold it up from the upstairs, while we screwed it into the studs on the wall, and VOILA!  "Custom made flower box!"


Sunday, September 16, 2012

Starfish

I love natural elements brought inside, and the shape and color of bleached starfish are perfect for beachy decor! After my neighbors put some starfish up, we followed suit and love them in our half-moon window!

We also have a garland of them, currently keeping a place on our coffee bar (until we find the perfect place to hang it:)

I think next will come one of the beautiful starfish wreaths for the door, and then, who knows!


Some other lovely starfish items:

http://hausandhome.blogspot.com/2011/05/starfish.html


(and one of my absolute favorites, from etsy)


http://www.etsy.com/listing/62235881/beach-decor-starfish-wreath-seashell?ref=&sref=